The Import Transactions Window
The Import Transactions window enables users to:
Review transactions from the online credit card export file.
Compare online credit card export file transactions versus QuickBooks® Credit Card account transactions.
Select the transactions to import.
Import transactions into QuickBooks®.
Within the Import Transactions Window, there are two data tables: QuickBooks® Account table and Import File table.
The QuickBooks® Account table displays transactions contained in QuickBooks® for the date range of transactions within the online credit card export file. This is a read-only table but it may be sorted on any of the columns by clicking the column header.
The Import File table contains all of the transactions in the online credit card export file selected. The date, amount and memo are taken directly from the online banking export file. The payee and account may be populated based upon whether the memo field matches an Alias. The status will be either Unmatched or Matched.
Matches occur when an existing QuickBooks® transaction and online credit card export transaction meet the following criteria:
Amount
Date within two weeks of each other
By selecting any Matched transaction, the corresponding transaction in the QuickBooks® Account table becomes highlighted thus enabling comparison of the two transactions.
Note: You may override the Matched transaction and import the transaction.
In order to Import a transaction, the payee and account must be selected as well as the Import check box.
Once all the information has been set for the transactions to
be imported, click Add to Register. Clicking Add to
Register prompts eZ Credit Card Import to start going through the
list of transactions. For any transactions selected, eZ Credit Card
Import will attempt to import the transaction into
QuickBooks®. If successful, the transaction will be put
in the QuickBooks® Account Table and the status will change to
Imported. Once each transaction selected has been attempted to be added,
the Import Status dialog box opens and shows the number successfully
imported transactions and the number with errors. The status within the
Import File will be updated. For transaction with errors, an
 icon will display on
the row. Users may view the specific error message by moving the cursor
over the icon.
icon will display on
the row. Users may view the specific error message by moving the cursor
over the icon.
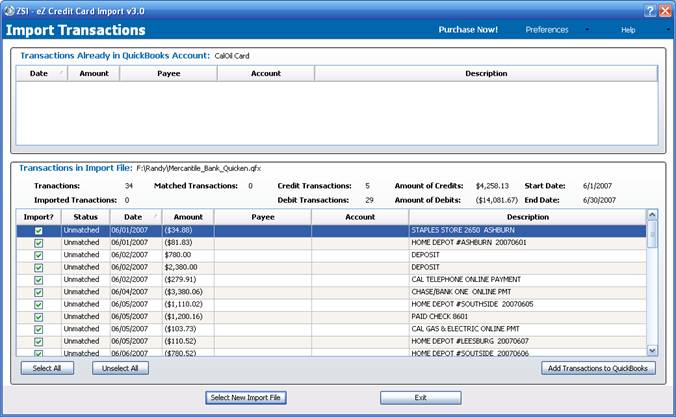
Figure 4: Import Transactions window
Elements of Window
The window contains the following elements:
|
Element |
Description |
|
QuickBooks® Account |
This area displays the information contained within QuickBooks® for the selected account within the date range of the online credit card export file. |
|
Transactions Already in QuickBooks Account table |
This table is a read-only table that displays the current transactions within QuickBooks®. This includes any transactions successfully imported by clicking the Add to Register button. The table may be sorted by clicking any of the column headers. |
|
Transactions in Import File |
This area displays information contained within the online banking export file. It is also the setting of QuickBooks® information for the transactions to be imported. |
|
Transactions populated field |
The total transactions contained within online credit card export file. |
|
Matched Transactions populated field |
The number of transactions matched to existing transactions in QuickBooks®. Matches occur if the transaction has the same amount and date within two weeks of each other. |
|
Credit Transactions populated field |
The number of credit transactions matched to existing transactions in QuickBooks®. Matches occur if the transaction has the same amount and date within two weeks of each other. |
|
Amount of Credits populated field |
The sum of cash credit transactions matched to existing transactions in QuickBooks® during the defined timeframe. |
|
Imported Transactions populated field |
The number of transactions that have been successfully added by clicking the Add To Register button. |
|
Debit Transactions populated field |
The sum of cash credit transactions that has been debited from the Quickbooks® account during the defined timeframe. |
|
Start & End Date populated fields |
Date range of transactions within the online banking export file. |
|
Transactions table |
Displays the transactions contained within online credit card export file. The following information will always be populated from the online credit card export file: Date, Amount, and Memo. The Payee and Account may be selected or can be populated via the Alias Table. Selection of this information is done via drop-down menus with the values coming from QuickBooks®. Status is controlled by the application and may be: Unmatched, Matched, Imported or Error.
The table may be sorted by clicking on column headers for Status, Date, Amount and Description. |
|
Select All button |
Selects all transactions for import. |
|
Unselect All button |
Clears all transactions from being imported. |
|
Import File Context menu |
Context menu is displayed when the user right-clicks on the Import File grid |
|
Add Vendor/Customer |
Opens the Add QuickBooks Vendor or Customer window. This window enables the user to create a new vendor or customer within QuickBooks®. The fields will automatically populate with information from the transaction where the right-click occurred. |
|
Alias->Add menu option |
Opens the Aliases window with a new row containing the transaction description of the transaction where the right-click occurred. |
|
Alias->Edit menu option |
Opens the Aliases window for creating, editing and deleting aliases. |
|
Split menu option |
Opens the Split Transaction window for splitting the transaction for the item on which the right-click occurred. |
|
Purchase Now button |
Enables an individual utilizing the Demo version of the software to purchase a 12 month license to use the software and updates that occur during those 12 months. |
|
Add Transactions to QuickBooks® button |
Will attempt to import all transactions within the Import File Transaction table that have the check box in the import column selected. When the import completes, a dialog box will open and show the results of the import. |
|
I don’t there there is an Edit Aliases button anymore, unless I am missing something? |
This is a right-click option now. |
|
Preferences drop-down list |
Displays a drop-down of buttons for setting preferences. |
|
Configuration |
Opens the Preferences window for configuring the eZ Credit Card Import. Configuration parameters include: enabling classes, allowing transactions to be assigned to customers, etc. |
|
Aliases |
Opens the Aliases window for creating, editing and deleting aliases. |
|
Select New Import File button |
Returns to the Select Import Information window to process a new file or reprocess a current file. |
|
Exit button |
Exits eZ Credit Card Import application. |
|
Help button |
Displays a drop-down list of options for specific help information. |
|
Help Home |
Opens a browser and navigates to online help for eZ Credit Card Import. |
|
About this window |
Opens a browser and navigates to online help for the Select Download File window. |
|
How Do I |
Opens a browser and navigates to the “How to…” section of online help. |
|
Registration Information |
Opens the Registration window and shows details on application registration. |
|
Audit Log |
Opens the Audit Log window and show the last 30 days of activities. |
|
About Zachary Systems |
Opens the browser and navigates to Zachary Systems Home page. |
 Associated Documentation: